Team Workflow
A team is a shared workspace that lets multiple people manage the same inventory together. Each team member sees the same supplies, locations, and history in real time, and every action is recorded in a team-wide audit log. Teams are ideal for supply rooms with multiple staff, ambulatory clinics that share a stockroom across shifts, and distributed operations that need a single source of truth.
Creating a Team
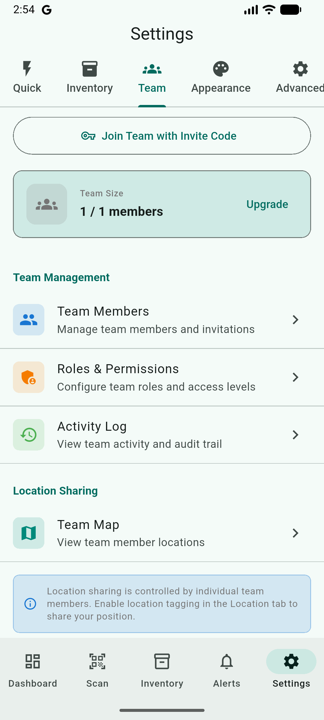
- Open Settings > Teams.
- Tap Create Team.
- Enter a team name (e.g. "ER Supply Room", "Clinic North").
- Optionally add a description and avatar.
- Tap Create.
You become the team Owner automatically. The team appears in your team dropdown immediately and is ready to receive members.
Roles & Permissions
Every team member has a role that determines what they can see and do. The app ships with five built-in roles:
| Role | Inventory | Members | Roles | Reports | Team Settings |
|---|---|---|---|---|---|
| Owner | Full read / write / delete | Invite, remove, change roles | Create, edit, delete custom roles | Read & export | Edit settings, manage billing, delete team |
| Admin | Full read / write / delete | Invite, remove, change roles | Create, edit, delete custom roles | Read & export | Edit settings (cannot delete team or manage billing) |
| Manager | Read & write | Invite (cannot remove) | — | Read & export | — |
| Member | Read & write | — | — | Read only | — |
| Viewer | Read only | — | — | Read only | — |
Custom roles
If the built-in roles don't match how your facility works, owners and admins can create custom roles with any combination of the underlying permissions:
- Team:
team.delete,team.settings,team.billing - Members:
members.invite,members.remove,members.roles - Roles:
roles.create,roles.edit,roles.delete - Inventory:
inventory.read,inventory.write,inventory.delete - Supplies:
supplies.read,supplies.write,supplies.delete - Reports:
reports.read,reports.export - Activity:
activity.read
To create a custom role:
- Open Team Permissions from the team menu.
- Tap + New Role.
- Name the role and toggle the permissions you want to grant.
- Tap Save. The role becomes available in every invite and member-edit dialog.
Custom roles can be edited or deleted at any time. The five built-in roles cannot be modified or removed.
Inviting Members
Owners, admins, and managers can invite people to the team in two ways:
Email invitations
- Open Team Members.
- Tap Invite.
- Enter the invitee's email address.
- Choose a role from the dropdown (built-in or custom).
- Optionally add a personal message.
- Tap Send Invitation.
The invitee gets a notification the next time they sign into the app. If they don't have an account yet, they can install the app, sign up with the same email, and the pending invitation will be waiting for them.
Invite codes
Use invite codes when you want to onboard several people at once or when email isn't convenient (e.g. handing out a code in a staff huddle).
- Open Team Members.
- Tap Generate Invite Code.
- Pick a role and an expiration window (1–90 days, default 7).
- Tap Generate.
- Share the alphanumeric code by any means you prefer (chat, email, printed handout).
Anyone who enters that code in Settings > Teams > Join with code before it expires is added with the role you assigned. Codes can be revoked at any time from the same screen.
Accepting an Invitation
If someone has invited you to a team:
- Open the app and sign in with the email address that was invited (or the same code).
- Open Settings > Teams.
- Pending invitations appear at the top of the list.
- Tap an invitation to see the team name, who invited you, the role you'll be assigned, and any message they added.
- Tap Accept to join, or Decline to dismiss.
Once you accept, the team appears in your team dropdown and you immediately see all team-scoped supplies, locations, and history.
Managing Members
From the Team Members screen, owners and admins can:
- Change a member's role — tap the member, choose a new role, save.
- Suspend a member — temporarily revoke access without removing them. Useful for staff on leave.
- Remove a member — permanently revoke access. Their historical actions remain in the activity log.
- Override individual permissions — grant or deny specific permissions that override the role defaults for one person.
Activity Log
Every action a team member takes is recorded in the Team Activity screen. The activity log captures roughly 30 event types across these categories:
- Team: created, settings changed, deleted
- Members: invited, joined, role changed, suspended, removed
- Invitations: sent, resent, revoked, expired, accepted, declined
- Roles: custom role created / edited / deleted
- Inventory: item created, updated, deleted, used, transferred, archived
- Reports: generated, exported
Each entry includes the actor (who did it), a human-readable description, a timestamp, and metadata such as the previous and new values for changes. Filters let you scope by category, date range, actor, or free-text search.
Members with reports.export can export the activity log to CSV for compliance reporting or external review. The activity log is append-only — entries can never be edited or deleted.
Team Map
If your team grants location permissions, the Team Map screen shows real-time positions of every active member on a single map. This is most useful for large facilities or distributed operations where supervisors need to see where their team is working.
- Active members appear as pins with their name and avatar.
- Tap a pin to see the member's last activity timestamp.
- Send a help request to a nearby member directly from the map.
- Configured geofences appear as overlays; entering or leaving a geofence is logged in the activity feed.
Cross-Device Sync
Teams are tied to your Firebase account, not to a specific device. When you sign into the app on a new phone, tablet, or browser:
- All teams you belong to appear in the team dropdown automatically.
- Team-scoped inventory syncs in real time across every device.
- Pending invitations show up on the new device as soon as you sign in.
- You don't need to re-accept invitations or be re-invited.
Team Limits by Subscription Tier
Team size and the number of supplies a team can track depend on the subscription plan attached to the team. The current beta release lifts all limits, but the production tier table is:
| Tier | Max members | Max supplies | Storage |
|---|---|---|---|
| Free | 1 (owner only) | 100 | 50 MB |
| Pro | 10 | Unlimited | 5 GB |
| Team | 50 | Unlimited | 25 GB |
| Enterprise | Unlimited | Unlimited | 100 GB |
Leaving or Deleting a Team
Leave a team (member)
- Open Settings > Teams.
- Tap the team you want to leave.
- Tap Leave team at the bottom of the screen.
- Confirm. You lose access immediately and your name disappears from the member list, but your historical actions remain in the activity log.
Delete a team (owner only)
- Open the team settings.
- Scroll to the bottom and tap Delete team.
- Type the team name to confirm.
- Tap Delete permanently.