Barcode Scanning
Healthcare Supply Manager uses ZXing as its primary scanner with ML Kit as a backup, optimized for the stacked GS1 barcodes that healthcare products use. This guide covers all scanning features and modes.
Supported Barcode Types
| Barcode Type | Description | Data Extracted |
|---|---|---|
| GS1-128 | Healthcare standard barcode | GTIN, Lot, Expiration, Serial |
| GS1 DataMatrix | 2D matrix code (common on small items) | GTIN, Lot, Expiration, Serial |
| HIBC | Health Industry Bar Code | Product ID, Lot, Expiration |
| UPC/EAN | Standard retail barcodes | Product ID only |
| QR Code | Quick Response code | Varies by content |
Basic Scanning
- Tap the Scan button on the bottom navigation bar
- Point your camera at the barcode
- Hold steady - the app will automatically detect and scan
- A success sound/vibration indicates successful scan
- Review the extracted information in the bottom sheet
- Ensure adequate lighting - avoid shadows on the barcode
- Hold the camera 4-8 inches from the barcode
- Keep the camera steady while scanning
- For small barcodes, tap to focus on the area
Understanding GS1 Barcodes
GS1 healthcare barcodes contain Application Identifiers (AIs) that encode specific data:
| AI Code | Data Type | Example |
|---|---|---|
| (01) | GTIN (Product ID) | 00312345678901 |
| (10) | Lot/Batch Number | ABC123 |
| (17) | Expiration Date | 251231 (Dec 31, 2025) |
| (21) | Serial Number | XYZ789 |
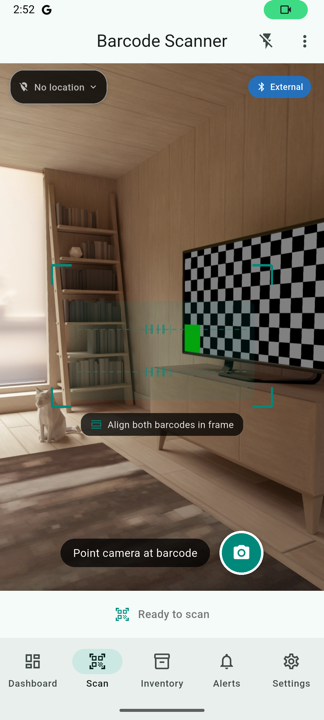
Stacked UDI Barcode Support
Healthcare products often use stacked barcodes (two separate barcodes on the same label):
- Primary Barcode: Contains GTIN (product identifier)
- Secondary Barcode: Contains lot number, expiration, and serial
The app automatically handles these in two ways:
- Same-frame detection: Both barcodes detected simultaneously and merged
- Two-scan fallback: Scan one barcode, then scan the second within 5 seconds - they'll be combined automatically
Batch Scanning Mode
Scan multiple items rapidly with continuous scanning:
- From the scanner screen, tap "Batch Mode"
- Each detected barcode is added to a queue automatically
- Visual and audio feedback confirms each scan
- Review all scanned items before adding to inventory
- Tap "Complete Batch" when finished
Shelf Scan Mode
Use Shelf Scan mode to capture every barcode visible on a shelf in a single high-resolution still:
- From the scanner screen, tap the mode selector at the top.
- Select Shelf Scan.
- Frame the entire shelf in the viewfinder and tap the capture button.
- The app captures a 4K still and runs barcode detection across the whole frame.
- Detected items appear as a list with thumbnails of where each barcode was found.
- Review the detections, adjust quantities if needed, and tap Save All.
3D AR Shelf Overlay
While in Shelf Scan mode, the app can display detected barcodes as 3D-anchored markers that stay locked to physical positions as you move the device. Unlike traditional ARKit / ARCore experiences, this overlay uses depth-from-size estimation, so it works on every iOS and Android device with a camera — no LiDAR or special AR hardware required.
How it works
- For each detected barcode, the app compares its pixel size against the expected physical size from the product catalog.
- This gives an estimated distance, producing a 3D anchor in camera space.
- As you move the device, the overlay re-projects the markers so they appear to "stick" to the real shelf.
- Each marker shows the product name, lot, and expiration confidence at a glance.
- Tap a marker to open the product details and add it to inventory.
AI Label Reader
When a scanned barcode is missing lot number or expiration — or when you scan a brand-new product the app doesn't recognize — the AI Label Reader can extract those fields directly from a photo of the product label.
The reader is fully integrated into the scan flow:
- Scan a barcode that's missing data.
- The bottom sheet opens and the AI Label Reader card appears at the top, with a thumbnail of the photo it just captured.
- If you have an AI provider configured, the reader runs automatically and fills in the missing fields.
- If the captured photo isn't clear, tap Retake photo, frame the label, and try again.
- Review the extracted values and accept them, or edit them by hand.
See the AI Features page for setup instructions, supported providers, and a tour of the reader UI.
FDA UDI Lookup
When scanning unknown products, the app can look up information from the FDA's GUDID database:
- Scan a barcode that's not in your catalog
- Tap "Look up in FDA Database"
- The app queries the FDA GUDID API
- If found, product information is pre-filled
- Review and edit as needed, then save
Information retrieved includes:
- Brand name and manufacturer
- Device description
- Product classification
- Company contact information
Manual Barcode Entry
If a barcode won't scan, you can enter it manually:
- Tap the keyboard icon on the scanner screen
- Enter the barcode number
- Select the barcode format if known
- Tap "Submit"
Scan History
View your recent scans:
- From the scanner screen, tap the history icon
- See a list of recent scans with timestamps
- Tap any item to view details or add to inventory
- Swipe to delete individual history items