Reports & Analytics
Generate insights from your inventory data with built-in reports and analytics. The Insights Hub is the main entry point and groups every report under four tabs — Expiration, Reorder, Financial, and Consumption.
Accessing Reports
- Tap the chart icon in the dashboard's top app bar (or open Insights from the navigation menu).
- Choose a tab: Expiration, Reorder, Financial, or Consumption.
Available Reports
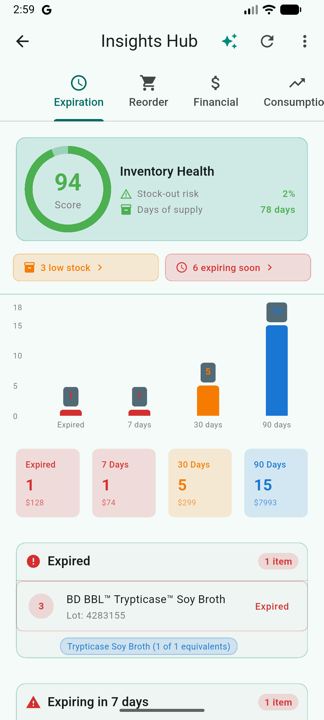
Expiration Forecast
Visualize upcoming expirations over time:
- Bar chart showing items expiring each month
- Filter by location or category
- View 30, 60, 90 day, or custom ranges
- Identify peak expiration periods
Inventory Value Report
Understand the value of your inventory:
- Total inventory value (requires unit costs)
- Value by location
- Value by category
- Value at risk (expiring items)
Note:
To enable value reports, add unit costs to your products in the Product Catalog.
Usage Trends
Analyze consumption patterns:
- Daily/weekly/monthly usage charts
- Compare usage across time periods
- Identify high-turnover items
- Spot unusual consumption patterns
Inventory Summary
Quick overview of inventory status:
- Total items and quantity
- Items by status (OK, Expiring, Expired)
- Items by location
- Low stock items
Exporting Data
CSV Export
Export your data to spreadsheet format:
- Go to Menu > Export
- Select what to export:
- Current Inventory: All items with quantities
- Expiring Items: Items within threshold
- Usage History: All recorded transactions
- Scan History: All barcode scans
- Full Backup: Complete data export
- Choose date range if applicable
- Tap "Export"
- Select where to save or share the file
CSV Format
Exported CSV files include:
| Column | Description |
|---|---|
| Product Name | Item description |
| GTIN | Product identifier |
| Lot Number | Batch/lot identifier |
| Expiration Date | Format: YYYY-MM-DD |
| Quantity | Current count |
| Location | Storage location |
| Status | OK/Expiring/Expired |
Sharing Reports
After generating a report:
- Tap the Share icon
- Choose to share as:
- CSV file attachment
- PDF document
- Screenshot image
- Select your sharing method (email, messaging, cloud storage)
Scheduled Reports
Set up automatic report generation:
- In Reports, tap "Schedule"
- Select report type
- Choose frequency (daily, weekly, monthly)
- Select delivery method (notification, email)
- Tap "Save Schedule"
Importing Data
Import inventory from CSV:
- Go to Menu > Import
- Select your CSV file
- Map columns to fields
- Preview the import
- Tap "Import"
Import Tips:
- Use the export format as a template for imports
- Ensure date format is YYYY-MM-DD
- GTIN should be numeric only
- Location names must match existing locations